

In the realm of smart home automation, customization plays a crucial role in creating a personalized environment. Home Assistant excels in this area, particularly with its badge customization on your dashboard.
With the ability to display dynamic information at a glance—such as current weather conditions, the status of lights, and important alerts—your interface becomes not only visually appealing but also incredibly intuitive. Imagine seeing a weather icon that changes color with temperature fluctuations or showcases device statuses in real-time.
This tailored experience allows you to efficiently manage your smart home while staying informed about essential updates. Whether you’re a tech enthusiast or simply looking for a user-friendly setup, customizing badges in Home Assistant can significantly elevate your smart home experience.
Adding and Managing Badges:
To get started with customizing badges in Home Assistant, you’ll need to access your dashboard and enter the edit mode. From there, you can add new badges, change their icons, colors, and text, and even incorporate dynamic information. This tutorial will guide you through the process step-by-step, ensuring you can make the most out of this powerful feature.
Tutorial: Customizing Badges in Home Assistant
- Access Your Dashboard:
Open Home Assistant and navigate to your dashboard. - Edit the Dashboard:
Click on the three dots in the top right corner and select “Edit Dashboard.” - Add a Badge:
Click on the “Add Card” button and select “Badge” from the list of card types. I normally use the Custom: Mushroom template badge. - Customize the Badge:
In the badge configuration panel, you can customize various aspects, after creating the card looks like: - Example Badge Configuration:
Here’s an example of a custom badge configuration with a dynamic icon and color: - Save and View:
Once you’ve configured your badges, click “Save” to apply the changes and view your customized dashboard.
type: custom:mushroom-template-badge
  content: Hello
  icon: mdi:mushroom
  color: red
Then you can start customizing the fields by getting dynamic data from sensors. If we want to change the icon into the current weather:
type: custom:mushroom-template-badge
   icon: mdi:weather-{{ states('weather.forecast_thuis') | replace('partly','partly-') }}
In this case the sensor weather.forecast_thuishas the weather at home. A next thing we can do is change the color based on the temperature. To do this we need to create a sensor that translates the temperature to a color value:
type: custom:mushroom-template-badge
  content: Hello
  icon: mdi:mushroom
  color: red
sensor:
- platform: template
sensors:
outside_temperature_color:
friendly_name: "Outside Temperature Color"
value_template: >
{% set temp = state_attr('weather.forecast_thuis', 'temperature') | float %}
{% if temp >= 0 %}
blue
{% elif temp >= 40 %}
red
{% else %}
{% set r = (255 * temp / 40) | int %}
{% set b = (255 * (1 - temp / 40)) | int %}
rgb({{ r }}, 0, {{ b }})
{% endif %}In the badge we can now simply use this sensor to change the color:
color: {{ states('sensor.outside_temperature_color')}}This will then result in a badge that looks like this:

When the weather changes the icon will change color and form according to the weather outside.
type: custom:mushroom-template-badge
  content: Outside conditions icon: >- mdi:weather-{{ states('weather.forecast_thuis') | replace('partly','partly-') }} color: "{{ states('sensor.outside_temperature_color') }}"
  tap_action: action: navigate
navigation_path: /lovelace/4Other examples of customization
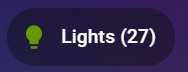
In addition to customizing weather badges, there are numerous other ways to enhance your Home Assistant dashboard with dynamic and informative badges. For instance, you can create a badge that displays the number of current alerts in your home, helping you stay on top of important notifications. Another useful badge could show the number of lights currently on, allowing you to monitor and manage your home’s lighting more efficiently. Additionally, you can add a badge to track the status of solar energy collection, providing real-time insights into your energy production and usage. These examples demonstrate the versatility of Home Assistant’s badge customization, enabling you to create a dashboard that is not only visually appealing but also highly functional and tailored to your specific needs.
type: custom:mushroom-template-badge
content: "{{ states('sensor.lights_on_count') }}"
icon: mdi:lightbulb
color: "{{ states('sensor.lights_on_color')}}"
tap_action:
  action: navigate
  navigation_path: /lovelace/lights
In this instance, a sensor (sensor.lights_on_count) serves as the label to display the count of lights that are currently turned on, resulting in:
In conclusion, customizing badges in Home Assistant not only enhances the visual appeal of your dashboard but also makes it incredibly functional and intuitive. By tailoring your interface to display dynamic information, you can stay on top of essential updates and manage your smart home with ease. Whether you’re tracking the weather, monitoring your lights, or keeping an eye on alerts, these personalized badges make your smart home experience truly unique.
So, dive into the world of badge customization and transform your Home Assistant dashboard into a hub of information and style. And remember, in the realm of smart home automation, a little customization goes a long way. Happy hacking, and may your badges always be dynamic and your smart home experience never break!
